Catheter Setup Tab
The catheter setup wizard guides you through defining the geometry and characteristics of your catheter design.
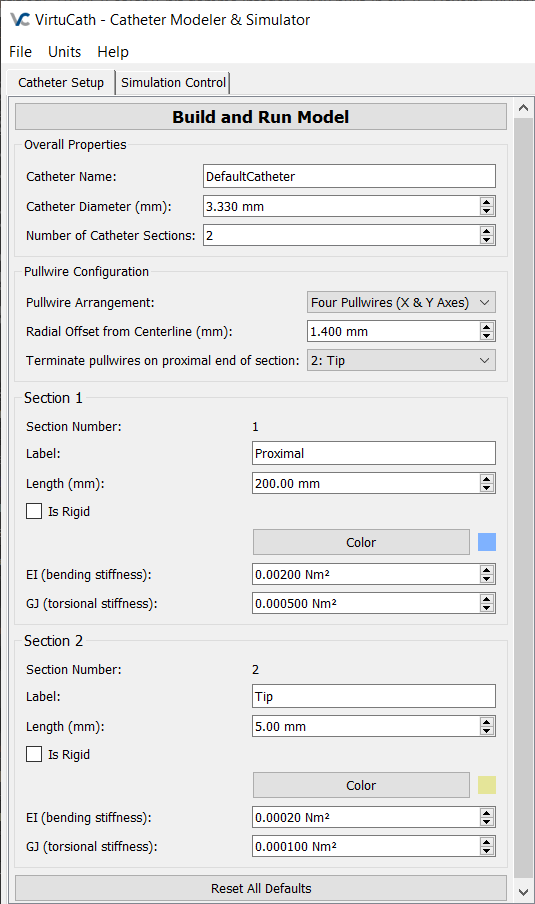
General Properties
- Load Config from File: Loads a previously saved catheter design from a configuration file. This bypasses the setup wizard and immediately jumps to the Review and Build step of the Setup Wizard. Also accessible via File > Load Config.
- Catheter Name: Assign a unique, descriptive name for your catheter design. This name will be automatically used in generated reports and assigned to exported images and data logs.
- Design Mode: Selects how the catheter layers will be constructed for each section.
- Fixed ID: Keeps the Inner Diameter (ID) of the catheter (mandrel) constant and adjusts the Outer Diameter (OD) based on the configured layer stackup. Set the Inner (mandrel) diameter in the input field below.
- Fixed OD: Keeps the Outer Diameter (OD) of the catheter constant and adjusts the Inner Diameter (ID) based on the configured layer stackup. Set the Outer diameter in the input field below.
- Fixed OD and Fixed ID: Keeps both the Outer Diameter (OD) and the Inner Diameter (ID) of the catheter constant. In this mode, the user selects one layer in the stack, the jacket by default, to adjust its thickness to meet the target ID and OD. Set the ID and OD in the input fields below.
Section Lengths

- Label: Provide a descriptive name for the section (e.g., "Distal Tip"). This name will identify the section in reports, data readouts, and exported log files.
- Length: Specify the length of this catheter section.
Note: Section length must be greater than 2 mm (0.12 in) and the cumulative catheter length must be less than 1500 mm (59 in). For best dynamic analysis performance, define only the flexible or steerable distal portion of the catheter that you intend to simulate. Modeling long catheters may decrease simulation performance.
- Color: Choose a distinct color to help identify this section in the 3D viewer. Click the color swatch to open the selection dialog.
- Section Controls: Reorder Section: Press the Up/Down arrows to swap the order of sections.
- Create New Section: Press the Green Plus button to generate a new section proximal to the selected section.
- Delete Section: Press the Red X button to delete the selected section.
Pullwire Settings

- Pullwire Arrangement:
- None: Not steerable.
- Single Pullwire: Simulates a catheter with one pullwire, typically for uni-directional deflection.
- Two Pullwires: Simulates a catheter with two pullwires, oriented 180 degrees apart relative to each other.
- Four Pullwires: Simulates a catheter with four pullwires, oriented 90 degrees apart relative to each other, allowing for bi-directional steering.
- Pullwire Anchoring: Defines the catheter section after which (distal) the pullwires are anchored.
- Pullwire Shape: Select the pullwire lumen shape (Round or Flat).
- Pullwire Lumen Size: Enter the inner diameter for round lumens or inner width and thickness for flat lumens.
- Include Lumen Liners: Use this checkbox to include pullwire lumen liners in the calculation:
- If unchecked, the lumens are modeled as unlined.
- If checked, you can select the liner material and wall thickness.
Section Construction
Define the construction for each catheter section.
Visual Feedback: At the top of the panel, a Cross-Section Visualizer displays a dynamic, scaled representation of your catheter's layers, materials, and internal lumens. This view updates in real-time as you modify layer properties.
Section Settings: Modify the section length and representation color without the need to navigate back to the Section Lengths page.
Layer Properties: Layers are defined from the Inside-Out, meaning Layer 1 is the innermost layer (liner), and the final layer is the outermost jacket.
Card Controls:
- Up/Down arrows swap the active layer with a neighbor.
- Red "X" deletes the selected layer.
- Green "+" button inserts a new polymer layer proximal to the selection.
- Color: Click the color swatch next to the layer name to change its representation in the 3D Viewer and Peel-away Visualizer.
- Name: An optional label for the layer (e.g., "Outer Jacket," "Braid," "Liner").
- Adaptive Layer Toggle: Only available when the global design mode is set to "Fixed OD and Fixed ID". Clicking the "Adaptive" toggle automatically calculates and locks this layer's thickness to perfectly satisfy the global inner and outer diameter constraints. Only one layer can be adaptive per section, and it defaults to the outermost polymer layer (Jacket). ℹ Note that reinforced layers (Braid/Coil) layers cannot be adaptive.
- Material: Select the polymer or matrix material for this layer. Reinforced layers inherit the material from the layer immediately outside of it.
- Layer Type: Choose the structural type of the layer:
- Polymer: A pure polymer layer. Innermost and outermost layers must be polymer layers.
- Braid: A woven wire reinforcement pattern.
- Coil: A helical wire reinforcement pattern.
- Thickness:
- For Non-Reinforced Layers: Enter the wall thickness manually (unless marked as the Adaptive layer).
- For Reinforced Layers: This field is Read-Only. The software automatically calculates the thickness based on the wire dimensions (2× wire thickness for Braids, 1× wire thickness for Coils).
- Dimensions (ID/OD): Displays the calculated Inner Diameter (ID) and Outer Diameter (OD) based on the cumulative thickness of previous layers.
- Pullwire Layer Settings: If Pullwires are enabled in the Global Settings, a special "Pullwires" layer is automatically injected into the stackup. This layer manages the position and space required for the pullwires and their optional liners.
- Construction Type:
- Individual Mandrels: Use this setting if the lumens are being constructed by individual mandrels prior to reflow. The layer's thickness is automatically calculated based on the pullwire lumen and liner dimensions defined in the global settings. The material is inherited from the layer to the outside of it.
- Multi-Lumen Extrusion: Use this setting if the lumens are created using a multi-lumen extrusion. The layer is modeled as a continuous multi-lumen polymer extrusion. You can manually enter the layer thickness (minimum thickness is constrained by the lumen dimensions) and select a polymer material from the library.
Reinforcement Settings: If "Braid" or "Coil" is selected, a sub-panel appears to define the wire geometry. A dynamic preview of the pattern (including calculated braid angle) is displayed.
Common Settings:
- Wire Material: Select the metal (e.g., Stainless Steel, Nitinol) from the material library.
- Wire Shape: Choose between Round or Flat/Ribbon wire.
- Wire Dimensions:
- Round: Enter the wire diameter.
- Flat: A dropdown of common ribbon sizes is provided for quick selection or enter a custom thickness and width.
Braid Specifics:
- Picks Per Inch (PPI): The number of wire crossings per inch of length.
- Number of Carriers: The number of bobbins used in the braiding machine (e.g., 16, 32, 64). The calculations assume one wire per carrier.
- Calculated Angle: The software displays the resulting braid angle relative to the longitudinal axis.
Coil Specifics:
- Pitch: The distance between the center of one wire wrap to the center of the next.
Results:
- Bending Stiffness (EI): Also known as Flexural Rigidity, this value defines the section's resistance to bending.
- Torsional Stiffness (GJ): Also known as Torsional Rigidity, this value defines the section's resistance to twisting.
- Central Lumen ID: Calculated based on the catheter OD and sum of layer thicknesses.
Manual Override Options:
- Layer Construction: The default selection, catheter section is constructed via layers and bulk section properties are automatically calculated.
- Manual Stiffness: Allows the user to manually enter the bulk section properties.
- Bending Stiffness (EI)
- Torsional Stiffness (GJ)
- Rigid Body: The section is modeled as a single, non-deformable rigid body.
Note: Multi-Lumen Cross-sections VirtuCath does not currently support multi-lumen cross-section designs. To simulate a multi-lumen catheter dynamically:
- Calculate the area moment of inertia of the multi-lumen layer. Please note that asymmetric cross-sections are not supported, pick the section moment of inertia of interest for the simulation.
- For a given layer OD, calculate the layer thickness so that the ring segment has the area moment of inertia equivalent to the desired value.
- Some calculated catheter properties like torsional and axial stiffness, kink radius, burst pressure, etc. will not be accurate for a simulated multi-lumen catheter.
Note: Alternative Methods to Determine Stiffness Values (EI & GJ)
Accurate bending stiffness (EI) and torsional stiffness (GJ) values are essential for a realistic dynamic simulation. If these properties are unknown for your design, here are two common methods to determine them:
1. Calculation from Geometry This is ideal if you have a CAD model of the catheter's cross-section and know the material properties.
- Bending Stiffness (EI): The material's Young's Modulus (E) multiplied by the cross-section's Area Moment of Inertia (I).
- Torsional Stiffness (GJ): The material's Shear Modulus (G) multiplied by the cross-section's Polar Moment of Inertia (J).
2. Physical Measurement Directly testing a physical sample is the most accurate method, as it captures the real-world performance of the manufactured component.
- Bending Stiffness (EI): Typically found using a three-point bend test, where a known force is applied to a sample and the resulting deflection is measured.
- Torsional Stiffness (GJ): Found by fixing one end of a sample, applying a known angle of twist at the other and measuring the torque.
While high-precision test equipment is ideal, simple benchtop setups can provide reasonable estimates for simulation purposes.
Review & Build
This is the final step where you can review your design before creating the simulation model.
- Color Bar: A scaled diagram of your catheter design. A black line indicates the pullwire termination point.
- Configuration Summary: Review all entered parameters before building the model. Click the "Edit" link next to any item to return to that section and make changes.
- Peel-away Illustrations: The illustrations are created parametrically for each section and accurately reflect the scale and composition. To copy the illustration for sharing, right-click and select Copy.
- Save Config to File: Saves the current catheter design to a file. This allows you to reload the design later or share it with colleagues. This function is also available from the main menu via File > Save Config.
- Build Model: Click this button to generate the simulation. VirtuCath will build the physics model based on your inputs and automatically load it in the interactive 3D viewer.